(→Others) Tag: Visual edit |
Tag: Visual edit |
||
| Line 30: | Line 30: | ||
=== Searing Blow === |
=== Searing Blow === |
||
* Upgrade {{C|Searing Blow}} every opportunity you can. Its damage increases more with each upgrade, reaching 100+ damage after ten upgrades. |
* Upgrade {{C|Searing Blow}} every opportunity you can. Its damage increases more with each upgrade, reaching 100+ damage after ten upgrades. |
||
| + | * [[Vulnerable]] is extremely good in a Searing Blow deck, as when upgrade a lot the extra damage can easily reach 40-50+ |
||
* The deck should be kept small to cycle back to {{C|Searing Blow}} as often as possible. |
* The deck should be kept small to cycle back to {{C|Searing Blow}} as often as possible. |
||
* If you decide to go for a Searing Blow deck, you should always take the path that gives you the most campfires |
* If you decide to go for a Searing Blow deck, you should always take the path that gives you the most campfires |
||
Revision as of 18:32, 26 August 2019
"The remaining soldier of the Ironclads. Sold his soul to harness demonic energies."
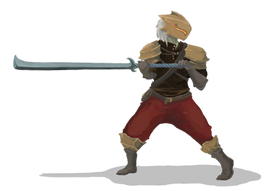
The Ironclad is one of three playable characters in Slay the Spire. He wields an arsenal of powerful strikes, boasts formidable defensive options, and can draw fiendish power from his demonic benefactors.
The Ironclad's starting Relic is Burning Blood, which heals 6 HP after every combat.
For the Ironclad's full list of cards, click here.
Basic Cards (Default/Starting Deck)
Strategies
There are many possible combinations of cards that work well together. It is often useful to not take a card if it doesn't support the combo you are going for. Some strategies include (please add more!):
High defense
- Body Slam,Entrench +Barricade/Calipers
- This strategy focuses on building up over multiple turns, potentially eliminating incoming damage.
 Plated Armor is an excellent fit in this build.
 - Body SlamandJuggernaut are excellent sources of damage, which is still important to win
- Barricadewith Orichalcum basically give you 6 permanent armor (stacks) when you don't block
High strength with high volume of attacks
- Spot Weakness, Flex, Limit Break, Demon Form, Inflame are cards that offer
 Strength. A helpful tip with Flex in particular is that if you have an
  Artifact before you use Flex, or trigger the effect of Orange Pellets after using Flex, you won't lose the
  Strength gained from it on the next turn. This gives Flex good synergy with sources of
  Artifacts, such as Clockwork Souvenir or Panacea
 - Whirlwind/Heavy Blade, Sword Boomerang, Twin Strike etc. are all cards that synergize well with
 Strength.
 - This build focuses on increasing
 Strength and multiply its power through the choice of attacks. Attacks that hit multiple creatures, or hit multiple times scale more effectively with
  Strength.
 - Reaperbecomes a very powerful healing tool with high
 Strength, especially when paired with a Magic Flower.
  Vulnerability cards such as Bash,Trip, and Thunderclap work very well with the high damaging attacks offered to you with high
  Strength.
Searing Blow
- Upgrade Searing Blow every opportunity you can. Its damage increases more with each upgrade, reaching 100+ damage after ten upgrades.
- Vulnerable is extremely good in a Searing Blow deck, as when upgrade a lot the extra damage can easily reach 40-50+
- The deck should be kept small to cycle back to Searing Blow as often as possible.
- If you decide to go for a Searing Blow deck, you should always take the path that gives you the most campfires
- Most must-upgrade cards become less valuable, as their upgrade is taking away from Searing Blow's power.
- You generally only want to aim for a Searing Blow deck if you meet the following criteria:
- You get it early in Act I (preferably before your first campfire)
- You have a path that can take you through at least 3+ campfires in Act I
- Card synergies:
- Headbutt - let's you play it an extra time each deck cycle
- Dual Wield - gives you additional copies if you manage to get it in the same hand as Searing Blow.
- If you get Dual Wield in a Searing Blow deck, you should prioritize cards that help you find the combo:
- Secret Weapon+ is probably the best one
- Violence is also good if your deck is small and you don't have too many remaining attacks in your deck
- Runic Pyramid will ensure that you get the combo at some point
- All exhaust cards can be very good at thinning your deck during combat
- Double Tap - let's your searing blow do double damage
- Armaments - can continually ramp up your Searing Blow damage during combat
- Relic synergies:
- Warped Tongs - will continually upgrade your Searing Blow over time during combat
- Wing Boots allow you to take additional campfires that you normally won't be able to get to
- Necronomicon - Doubles the damage of Searing Blow every time you play it
- Pen Nib - double damage of Searing Blow but requires some planning to execute
- Paper Phrog - a minor synergy but at higher Searing Blow levels the increase of damage from this relic is significant
- Dolly's Mirror - if you get this after you have upgraded your Searing Blow a few times, it will effectively double the strength of the deck.
Exhaustion synergy
- Corruption, Dark Embrace, Fiend Fire, Sentinel and Dead Branch or Charon's Ashes
- This strategy gains power from exhausting cards. In addition to those listed here, cards that are exhausted upon use are helpful here.
Exhaustion / Defense Combo
- Unlike the normal exhaustion and defense strategies above (which focus on building up power over time), your goal here is to try and make your deck almost entirely out of skills, get out Corruption and Dark Embrace together, then burn through your entire deck in one turn to raise your defense, with doubling effects from Entrench played last, finally followed by one or more Body Slams to kill the enemy in one hit.
- The essential cards are Corruption, Dark Embrace, Entrench, and Body Slam, plus cards like Impervious, Shrug It Off, and Sentinel to build defense before you double it with Entrench. Provided you keep your deck overwhelmingly tilted towards skills and fill it with lots of card draw, you should only need to draw Corruption and Dark Embrace before you start comboing off; the rest of the combo will be found as you draw your deck. Multiple copies of Entrench or Body Slam (or things that duplicate them) are still extremely valuable; you also want to upgrade Corruption, Dark Embrace, and Body Slam to reduce the cost of the combo so you can deploy it faster.
- It's also important to have cards that let you dig for your combo, such as Shrug It Off, Burning Pact, and Offering. Beyond just letting you dig for your combo, these let you draw past attack cards when comboing off.
- Hitting your hand maximum is a serious problem, especially if you obtain multiple copies of Dark Embrace or large numbers of card-drawing skill cards.Bloodletting can help you play other cards to get them out of your hand and can provide the energy you need to play Corruption and Dark Embrace as soon as possible.Burning Pact allows you to get unwanted cards out of your hands while drawing a large amount. Once the combo is deployed,Sentinel will both provide additional
 Block and a large amount of free energy to play out the rest of your hand.True Grit can be used to avoid cards getting clogged in your hand, but it's extremely important to upgrade it to avoid the risk of having it hit your combo pieces.Offering both draws you cards and gives you energy to play your non-skills.
 - Double Tap and Dual Wield can amplify the final blow by doubling your Body Slam, while Secret Weapon can dig for your Body Slam. Do not upgrade your Secret Weapon, since you want it to be exhausted so Dark Embrace will let you draw a card off it.
 Artifacts that provide persistent benefits to your defense or exhaustion intended to help you over multiple turns or which give you minor benefits for exhausts and
  blocks are somewhat less useful to you, since your goal is to combo off in a single turn for overwhelming damage rather than slowly accumulating benefits; but they're still worth collecting, since they give you a backup strategy in case you can't get all your combo pieces or something else goes wrong.Barricade is particularly useful because it allows you to, if necessary, split your combo over multiple turns, or to accumulate
  Block slowly before you finally get everything you need to go off.
- An alternative but similar strategy is to use Juggernaut, Corruption, and Feel No Pain. Each defensive skill played is worth an additional 10-14 damage.Iron Waves are good fallbacks.
- Removals should focus on getting rid of your Strikes rather than your Defends; while your Defends aren't as good as your other
 Block cards, they can still be cycled through for free once you have Corruption and Dark Embrace out.
Perfected Strike synergy
- Perfected Strike+ strike cards (Strike,Pommel Strike,Twin Strike,Wild Strike)
- Your deck will become very heavy, lots of draw like Battle Trance will be important, as will in-battle upgrade effects likeApotheosis,Armaments+, and Warped Tongs.
- Powerful defensive cards will be a must when offered, since you will be taking large quantities of offensive cards.
- You will also need to be on the lookout for strong defensive Relics, such as:
 Self-Forming Clay,
 Orichalcum, or
 Anchor
 - Dual Wieldincreases the power of the deck a lot more than usual, increasing the damage of each Perfected Strike by up to 6, and increasing the amount to be drawn.
- A 4th energy is particularly important to be able to play multiple copies if desired.
Self-Status
- Uses powerful cards with drawbacks that inflict Status cards, such as Wild Strike,Power Through,Reckless Charge and Immolate, with Evolve to negate the loss of draws.
- Exhaust cards like True Grit,Sever Soul,Second Wind, and Fiend Fire can keep you from becoming overwhelmed in long term fights.
- Mark of Pain effectively loses its downside.
- With an upgraded Evolve, a 9 card Fiend Fire happens easily.
- This build mitigates the power of most Status inflicting enemies, and synergizes well with many other deck types.
Masochist
- Utilizes Rupture and cards that deal damage to you, aiming to finish fights quickly.
- RuptureandBrutality together means you gain 1
 Strength per turn. Only 1 copy of each is necessary, more won't increase the
  Strength gain.
 - Hemokinesis,Offering, and Bloodletting are the other cards that self harm.
- Reaperbenefits from the
 Strength gain and provides some much needed healing.
 - Any cards that benefit from gain are good here.
- Draw to get your combo together is very helpful. Make sure to get some defense to keep outside damage taken low.
Card Draw + Fiend Fire
- Gather a lot of cards, especially cards with card draw and energy like Battle Trance.
- With a lot of cards in your hand use Fiend Fire to deal high damage to target.
- Fiend Firescales very well with
 Strength and Relics.
Kick kick and kick
- Get Dropkick and remove as many other cards as possible. Once you have 2Dropkicks or 1Dropkick +Dual Wield, you can play Bash + lnfinite Dropkick. Upgraded Offering is very useful in this build because it can draw 5 cards, which means that you can infinite kicks with a 10 card deck.
- This is an easy to assemble but strong build. It can be done with restarting short games to get Dropkick early.
Snecko Eye and High Energy Cards
- If you manage to get Snecko Eye during first Boss fight, you can go for cards with high energy costs as main damage dealer: Bludgeon, Carnage and Immolate are the best, while Sever Soul and Fiend Fire can help with clutter.
- Dual Wieldis what makes this build shine: getting two zero cost Bludgeons is usually enough to finish a fight.
- Defensively it's possible to focus exclusively on Flame Barrier.
- Going forPerfected Strike build is a sound strategy prior to getting Snecko Eye, since Boss rewards are rather random.
Unlocks
| Unlock Number | Prizes Unlocked |
|---|---|
| 1st | Heavy Blade, |
| 2nd | Omamori, Prayer Wheel, Shovel |
| 3rd | Wild Strike, |
| 4th | Havoc, |
| 5th | Blue Candle, Dead Branch, Singing Bowl |
Gallery
The Ironclad appearing prominently in the card art for Jack Of All Trades

